The Situation
We often use forms to collect data. Sometimes, we need to limit the time during which people can submit data to a certain set of open and close dates. It’s certainly possible to go change permissions on the underlying list or library to take away contribute permissions when outside the open time period. But, that relies on a person remembering to do it on time, and it’s confusing for people to have the UI change (no more “add new item” option) with no explanation of what’s going on. Also, when building forms for less tech-savvy site owners, changing permissions can be confusing.
The Solution
Using a combination of SharePoint lists and InfoPath forms, it’s possible to create a solution that is easy for site owners to manage and gives clear and concise information to end-users.
The Set Up
You’ll need 2 lists.
The Open/Close List.
Create a custom list. I called mine “Open and Close Dates.” This list should have 3 columns – the title, the open date (date & time column) and the close date (date & time column). The title will be used to filter the open/close dates when we pull them into the InfoPath form, so that you can open and close more than 1 form with the same list.

The form list
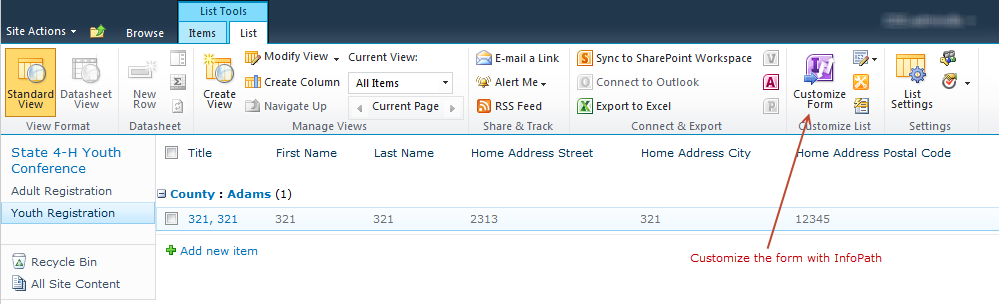
In my case, I’m using a custom list with a custom content type. But, it should work for any custom list. There are a couple of important settings here. First, on list settings -> advanced settings, make sure that Datasheets are disabled. Otherwise, users will be able to circumvent your InfoPath form.

Second, since none of this magic happens without InfoPath, we want to click the “Customize Form” button to customize the form used with the list in InfoPath Designer.
The InfoPath Magic
Once in InfoPath, there are a few steps to get this all working.
- Set up a data connection to your “Open and Close Dates” list. (For step-by-step directions with pictures for creating a connection to a SharePoint List, check out Wonder Laura’s post.)
- Click the “Data” tab and click “From SharePoint List”.
- Enter the site URL.
- Select your open/close list.
- Check off the following: Title, Open Time, Close Time (sorting is irrelevant in this case)
- Name your data connection whatever you’d like.
- Create Open and Closed fields and set their default values
While we can pull the open and closed fields from the data connection we created in step one, there are places where we can’t filter on the fly if we have more than one value in the open/close list. So, we need to create open and closed fields in our main data connection, or in a dummy one. I did it in the main data connection, because I don’t really care if we have a couple extra columns of data in our form list. But, if you’d prefer to set up a dummy data connection, John Liu has a great post on doing that. Here’s what I did.- In the main data connection, click “Add Field”.

Add a Field to the Main Data Connection - Set the display name to “open.”
- Click the “fx” button for the default value.
- Select “Insert Field or Group.”
- Click “Show Advanced View.”
- Choose the Open and Close Dates datasource.
- Open the “dataFields” folder.”
- Select “Open Time.”
- Click “Filter Data.”
- Click “Add.”
- Select “Title” in the first drop down and set it equal to whatever text you set in as the title in the list.
- Click “Ok” on all the open dialog boxes.
- Your field properties should look something like this:

Example of the “open” field. - Repeat process to create a “closed” field.
- In the main data connection, click “Add Field”.
- Create a “Closed” view.
- Click the “Page Design” tab.
- Click “New View.
- Enter a name. (I called mine “Registration Closed.”)
- Type whatever “form closed” message you want. Mine pulled in the open close dates and displayed them, like so:

Sample “Closed” View
- Set Form Load Rules
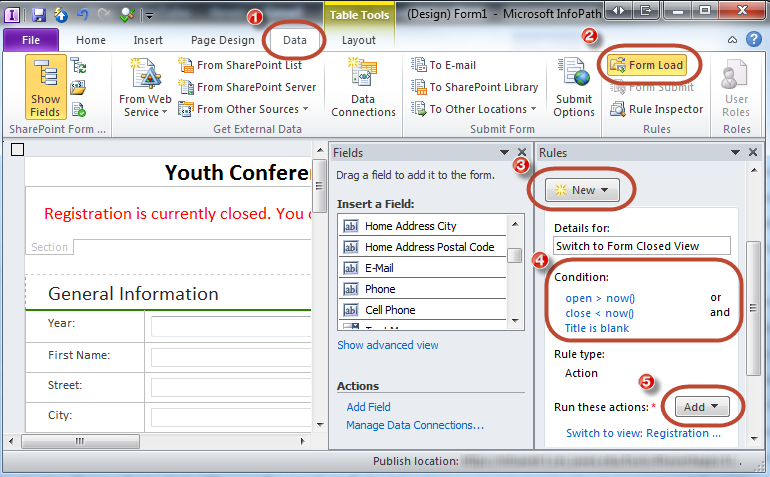
Steps to set a form load rule to switch views to “closed form” view. - Click the “Data” tab.
- In the “Rules” section, click “Form Load.”
- Click “New” and select “Action.”
- In the “Conditions” section, click “None” to set conditions.
- You need 3 conditions: open > now() OR close < now AND title is blank. (Open and Close are the fields in the main data connection that you set up in Step 2. Ensuring that title is blank means this will only run when a new form is loaded.)

Form Load Conditions - In the “Run these actions” section, click “Add” and select “Switch Views.”
- Select your “Registration Closed” view.
- Add a Submit Button to the “Edit Item (default)” View
In our next step we’re going to remove the InfoPath buttons. So, our users need a way to submit their data, but only when the form is “open.”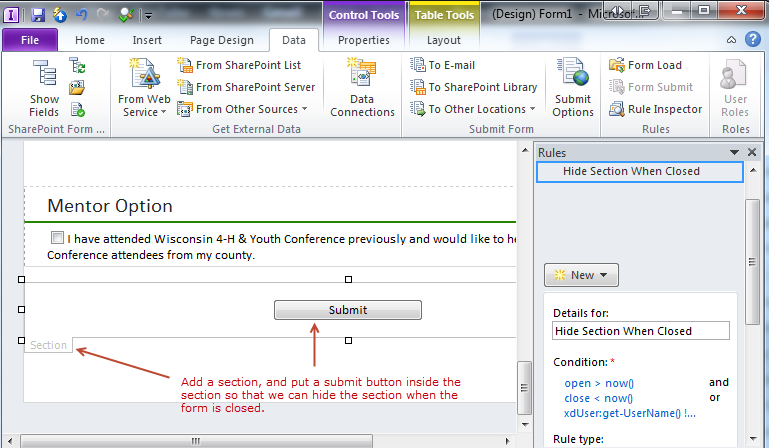
Add a Submit Button inside a section. Hide the section when form is closed. - At the bottom of the form, add a new section. (Home Tab -> Controls -> Containers -> Section)
- In this section, add a button.
- Right click on the button and select “Button Properties.”
- Set the Action to “Submit.” You can modify the label if desired, or leave it as the default.

Submit Button Properties
- Hide the Submit Button Section when form is closed.
- Click on the section tab, and click “Manage Rules.”
- Click “New” and select “Formatting.”
- Click “None” under “Condition” to open a menu for setting conditions.
- Here we need 2 (or possibly 3) conditions. The 2 that are a must are: open > now() AND close < now(). If you have an administrator that should always be able to edit data, you’ll want to add a third condition. This one is “OR xdUser:get-Username() != “youradminusername.”
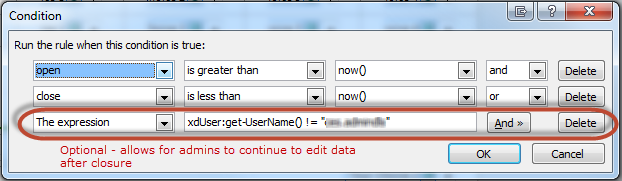
Set the rules to hide the submit button section when closed and not being viewed by an admin. Check the “Hide this control” checkbox.
- Create a “Registration Closed” notice on the form.
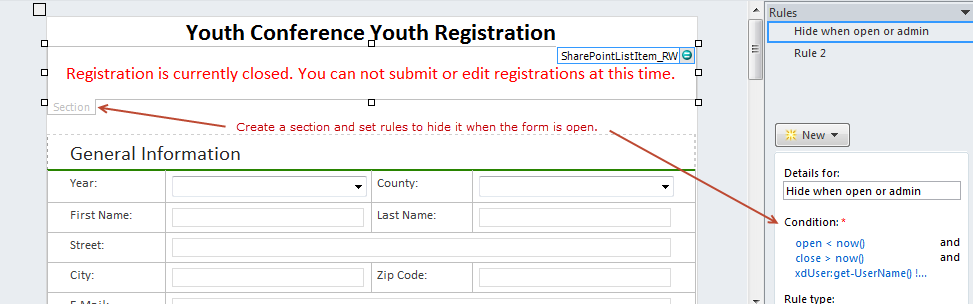
Create a section at the top of the form to indicate closed status. - At the top of your form, create another section. (Home Tab -> Controls -> Containers -> Section)
- Add a message to indicate registration is closed. Mine says, “Registration is currently closed. You can not submit or edit registrations at this time.”
- Click on the section tab, and click “Manage Rules.”
- Click “New” and select “Formatting.”
- Click “None” under “Condition” to open a menu for setting conditions.
- On this section, you need the opposite conditions as the submit button, because you want this one hidden when the form is open. So, you need: open < now() AND close > now(). If you don’t want the administrator to see it, then you need the expression “xdUser:get-UserName() != ‘YourAdminUser’.”

Conditions for the form closed notification.
- Remove the Infopath buttons.
- Click the “File” tab.
- Click “Form Options.”
- Click “Web Browser.”
- Uncheck “Show InfoPath commands in Ribbon or toolbar.

Uncheck InfoPath Commands in the Form Options


The Finished Product
With everything set up, when users come to the site, they will always be able to click the “Add New Item” button on the list, but if data collection is closed, they’ll receive a friendly message with an explanation.

When a user attempts to edit an existing registration, they’ll be notified that the registration is closed, and there will be no submit button for saving changes.

The Caveats
Hey, it’s SharePoint. You know there are some.
What I’d really like to be able to do is to determine the state of the form when it opens. Is it in edit or view mode? If in edit mode & registration is closed, switch to the closed view. If it’s in view mode, don’t. Alas, I’ve yet to be able to figure that one. Got any ideas?

Hi Deanna, great blog! I see that you referenced one of my blog posts, so I just wanted to let you know that there’s a new URL. http://wonderlaura.com/2011/8/1/infopath-query-specific-sharepoint-list-data
Thanks. Updated.
Hi Deanna,
Please can you show how your converted YYYY-MM-DDTHH:MM:SS into the text format that you have in you closed registration form. I think because of the format open and close date is not functioning in my set up.
Please any help would be greatly appreciated.
Thanks in advance